Wednesday 31 December 2014

Sheep are disgusting.

(Normal people spend New Year's Eve washing fleece, right?)

The thing about sheep is, they're animals. They eat, they poo, they sweat, they step in stuff, they roll in stuff. When the fleece comes off it's pretty gross and needs to be washed before anyone plays with it.

There are a million ways to get the crap out of a fleece, both literally and figuratively. The two main schools are hot-water-and-dish-soap and fermented suint. Since I live in 3rd-floor apartment in central London, I generally use the former. Fill the bath with hot water and Fairy Liquid, swish around, drain, rewash if the water's really gross, then rinse and air-dry. I think my neighbours might complain if I started leaving buckets of fleece out in the communal garden.

I've been thinking a lot recently about whether this method in any way resembles the way people in the Middle Ages washed fleece, and my gut is telling me no. (Obviously I'm going to have to confirm this with research and documentation, but hear me out.)

  1. The hot-water-and-soap method is really time-consuming, and I've got access to a hot water system that doesn't rely on chopping firewood and hauling buckets to make it go. It takes me about 6 hours of actual work per fleece to process, and that's not including drying time. If I had a whole flock and had to process all of the fleeces every single year AND comb and spin them AND weave (or otherwise clothify) all of them in order to have a new piece of clothing, I wouldn't want to waste so much time.
  2. Firewood is expensive, either in terms of labour or in terms of money. Ditto soap. I go through about a quarter of an economy-sized bottle of the stuff per fleece, and it's concentrated.
  3. Hot water melts the lanolin and soap does an excellent job of removing it. But lanolin is what makes wool waterproof, so if my goal was warm clothing that would survive all weathers, I wouldn't want to wash the lanolin out.
  4. The fleece-to-garment process involves multiple stages of wet treatment, any of which could involve a hot soap wash.


So what my method does is take time and money to get an end result that isn't fit for purpose. That's not very helpful.

Access to water in the Middle Ages was primarily via surface water - rivers, lakes, ponds, things like that. There aren't any of those close to me, but I do have a cold tap and a bathtub. And I'm terribly fond of Scientific Experiments. Consequently, I'm going to do part of my current batch with my usual method and part with just a cold water "wash" and see how the results compare.

Here's the fleece:


The piece of paper is for contrast. The fleece is nominally white, but as you can see there are degrees of white. This is a pretty clean fleece. Minimal vegetable matter, hardly any dingleberries, no second cuts. It's still very yellow.


Not a huge difference, but there's already a clear difference after one wash with hot water and Fairy Liquid. This is the water after that rinse and the solid dirt left in the tub:


Urine, sweat, dirt, all kinds of delicious stuff. Also, this is what minimal vegetable matter looks like:


The second batch, just rinsed with cold water:


The water is less cloudy, which is what I'd expected since there's no melted lanolin in it. The fleece itself is still tacky to handle but is actually less discoloured than the stuff that's been washed with hot water and soapy liquid. The biggest difference is that the tips of the fleece haven't come clean - not a huge issue, since I'll be combing before I spin anyway.

Removing vegetable matter is about the same, and intriguingly the very few second cuts floated away in the cold rinse. They tend to stick in the hot wash. Also, rinsing in cold means having to be less careful about agitation - you need heat to full wool.

The side-by-side washed fleece:


Cold on the left, hot on the right. The dirty tips are visible, but you can see that they're visibly about as clean. Assuming that the tacky feeling isn't a problem when it comes to spinning, this has the potential to vastly speed up the processing.

Wednesday 17 December 2014

Some things that are not shirts

I'm working on two more Tudor shirts (this time both for me). They're going to become a series of posts that give complete guidelines on how to make shirts, but in the meantime, I've finished a couple of smaller things.

First up, a belt favour masquerading as a sock. Belt favours are a custom in the SCA - non-fighters give them to fighters as a token. Wearing them can mean a whole bunch of things, but literally means that the fighter has found favour with the non-fighter. In this case, it's a running joke with my "wife", who once caught a sock flung at her head and proclaimed herself a free house-elf.


Yarn is leftover Kauni from a shawl I made a few years back. This sock is a Very Significant Project. It's entirely made up from inside my head - I guesstimated all the numbers, including the ones for turning the heel. I also knit the whole of the gusset in the dark while I was at a gig. I definitely levelled up by knitting this.

Second, a SNOOOOOOD for Tyger Friend. Like me, she dabbles in steampunkery, and so when I dug up some discontinued bronze lurex yarn from the deep stash it occurred to me that it would make an awesome gift for her. It took about 7 hours, or one very lazy weekend spent mostly playing Skyrim.

Wednesday 3 December 2014

The second shirt, or, THE SHIRT OF INSANITY!

(This project was created as a surprise gift, so I've recorded everything as I went along in a single post. Now that it's been delivered, I can post this publicly.)

Having made one fairly straightforward shirt, I decided to dive immediately into the next one. I wanted to do something more complicated, and as it happened I had the perfect project in mind. This is what I did.

24 August

I've been planning to make something as a gift for Baron P., the guy who taught me to shoot last year and started me off on this whole saga of archery, late-period English clothing, and a million crazy research projects. (Come to think of it, I'm not entirely sure why I'm making him a present. But it's too late now.) I figure, all the hours he's put in answering my questions, he deserved something shiny. Coincidentally, he's recently been spiffing up his own garb and at Raglan was elevated to the Order of the Pelican. So instead of the embroidered collar and cuffs I'd originally thought I'd do, I decided that I'd go all out and make a complete shirt with fancy embroidery, frilled collar, the lot.

The first step was figuring out how I was going to construct the whole thing. I've been poring over Patterns of Fashion 4, looking at all the different shirts and how they were put together. Based on those, it looks like the most common method was a single long strip for the front and back, usually made from the full width of the cloth. Sleeves either straight with an underarm gusset or trapezoids without. The cool thing is that the pieces are usually hemmed all the way around and then joined with insertion embroidery rather than being seamed. So that's what I'm doing - a single piece of cloth for the body, straight sleeves with a gusset, and hems and insertions.

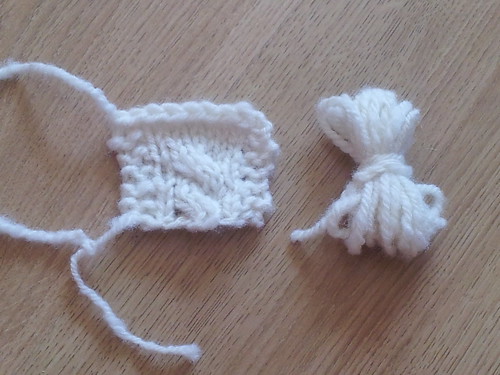
I spend the morning cutting out the pieces that get hemmed. The linen I've got is 54 inches wide, which is far too wide for a shirt. Consequently, I'll have a selvedge on one side and a hem on the other. There are examples of this in the book (items 2 and 5, in Munich and Prato respectively), so it's an acceptable option. I've cut the shirt body 30 inches wide, which leaves me with exactly the right amount of fabric to the side to be the full length of the sleeve, leaving the selvedge on the cuff end of the sleeve. I've cut both of them out as well. I then cut a strip 5 inches wide below the sleeves. Two 5-inch squares will become the underam gussets; the rest of the strip will be for me to practice the insertion stitches and test the embroidery. I may use a bit to make gussets for the neckline also.


My next task is to hem all the pieces I cut out. I've hemmed one gusset and one sleeve today. Once the hemming is done, I'll chart up the embroidery and start working on the sleeves. The gussets are small enough that I'll be able to take them in with me to work and do the stitching around the edge that becomes the foundation for the insertion.

26 August

I spent most of yesterday brainstorming the design for the sleeve embroidery. I knew I wanted to do columns and spot motifs like the Bath Fashion Museum shirt I used as a model for shirt the first, but beyond that I had no specific ideas. Those sleeves had three columns of densely stitched vines and flowers running down the length of the shirt. In between were isolated motifs of oak leaves and acorns, and bees. I didn't really want to do flowers again, and the acorns-and-bees thing would just be too similar to what I'd done for my husband. Fortunately, there was a very obvious choice for something to use as a spot motif - a pelican in her piety. I recalled that Patterns of Fashion had reproduced a number of motifs from Schole-House for the Needle (a pattern book published in 1632), and as it turned out, one of them was of a pelican. Serendipitously, on the same page was reproduced a springing stag, which just so happens to be on the Baron's coat of arms.

After an hour of sketching and rubbing out designs:


and a little trying things out with needle and thread:

I finally got to the point where I had a concept that I liked.


29 August

My self-imposed deadline for this project is an event taking place the last weekend of November. In other words, I've got just about three months to finish. Because I'm a crazy person, I decided to write up a list of all the bits that need to be done between now and then to get the shirt finished.

  • Finish hemming the second sleeve
  • Hem the body
  • Embroider both sleeves
  • Embroider the neck opening
  • Embroider the collar
  • Embroider both cuffs
  • Embroider and hem the frills for the collar and cuffs
  • Work the foundation for the insertions on the seams
  • Assemble the cuffs with frills and ties
  • Assemble the collar with frill and ties
  • Gather sleeves and attach cuffs
  • Cut and hem neck opening
  • Reinforce bottom of neck slit
  • Gather neck opening and attach collar
  • Lace the seams together.
I also need to decide whether I'm going to embroider around the edges of the body. Fortunately for my sanity, I don't need to make that decision until after everything but the seam lacing is done. I'd like to, both because most of the really fancy exemplars have and because it's awesome. At the same time, it's a lot of work to put in to something that's going to be tucked into trousers most of the time.

2 September

I've finished the hemming! (Ok, the frills still need to be done, but I can't do them until they're embroidered and cut out.) My brain has very kindly been providing me with inspiration and the ability to make decisions over the last couple of days, so things are progressing. I ended up deciding firmly in favour of embroidery all the way around the edges of the body and have started working on them while I wait for the Muse to decide whether she's happy with the modifications I've made to the initial embroidery sketches.

My very scientific method of deciding how many motifs I wanted on the sleeves - cutting out bits of paper roughly the same size as the motifs and laying them on the fabric until it suited me:


8 September

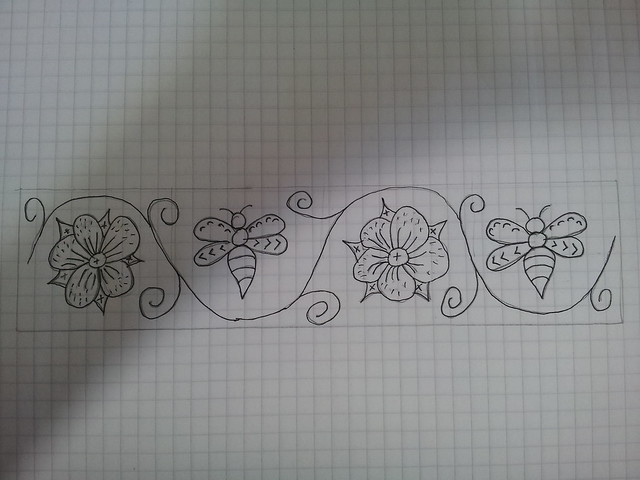
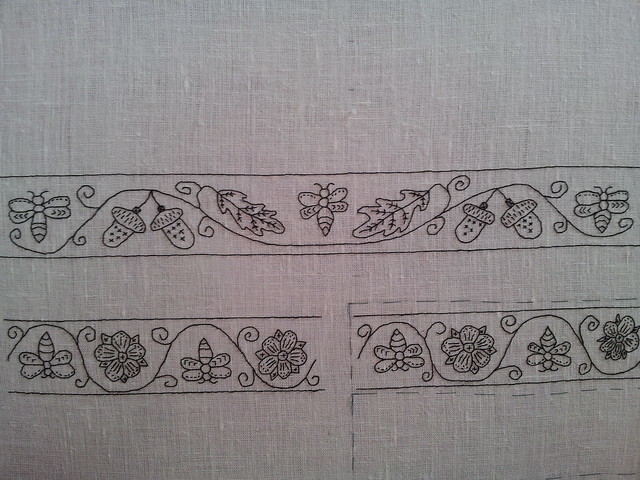
Mental progress, if not a great deal of physical progress. I have finished designing the embroidery. This is the design for the cuff:

The collar will be the same, only with more repeats of the lattice and flowers between the pelicans. The embroidery that borders the neck opening will be the same, only with the lattices running vertically and a single pelican at the base of the opening.

The sleeves will have a similar lattice, but it'll be narrower. Instead of 8-petalled flowers inside the diamonds formed by the lattice, the smaller 4-petalled flowers will appear. There will be three columns of lattices on each sleeve. In between the lattices there will be two columns of five spot motifs, each comprising alternating pelicans and stags (three and two of each, respectively). The frills will have individual 4-petalled flowers without the lattices.

All of the lattices are bordered by a straight double line. That double line is what I am using as the edge embroidery.

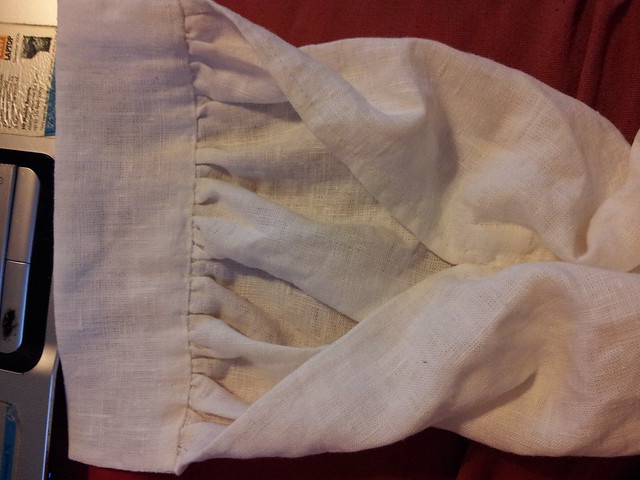
Now that the design decisions are mostly out of the way, it's time to crack on with the sewing. Today's mission is figuring out my cutting layout for the collar, cuffs, and frills. I enlisted the help of Baron P's lady wife to get his collar measurement, and I'm making it the same width as the previous shirt. Looking at different frills on extant shirts, they seem to range from 1.5 to 3 times as long as the band they are set in. My frill is going to be 35.5 inches long because that's the length of the piece of fabric I have left. I've decided to use the selvedge edge for the frill to save time hemming - this fabric has gorgeous selvedges, almost indistinguishable from the fabric proper, so it won't be obtrusive.

later on the 8th

No embroidery on the frills. I tried it, and it frankly looked like crap once it was all gathered up. Ah well, at least that's a few hours saved!

10 September

Some photos of my progress to date. The long strip at the bottom is the collar frill, now hemmed on the two short ends. The big pieces are the sleeves, and the two small squares are the underarm gussets. (Incidentally, several of the extant shirts I've been looking at have embroidered gussets. Seriously. Talk about conspicuous consumption!)

 I'm still beavering away at the embroidery on the body of the shirt over my lunch hours at work. It's utterly mindless, and the body is completely hemmed so I don't have to worry about it fraying from being hauled around.


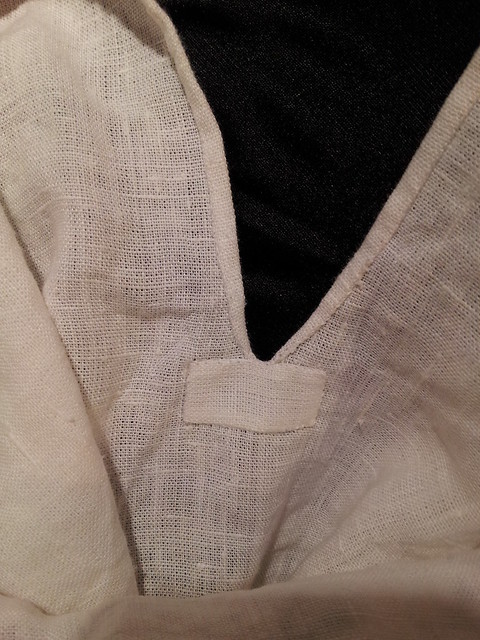
The red basted lines are the shoulder "seam" and the neck slit. At least, they will be once I've cut them. I'm still trying to decide whether it would be better to cut the openings and hem the neck slit before or after I work the embroidery around the neckline.

25 September

Sigh. Things are never straightforward. That annoying niggling voice in the back of my head has been telling me that the style of embroidery I'm doing really doesn't match the style of shirt, and after doing rather a lot of thinking and research, I've concluded that the voice is right. (Also the voice didn't like the 8-petalled flowers I'd designed, so I've changed them.)

The problem is with the frills, or rather with the combination of frills plus embroidery. The style of embroidery is very firmly in the style of the 1590s, by which point frills on shirts had disappeared in favour of detached ruffs. Since there's no way in hell I'm redoing all that embroidery, I've decided to just skip the frills. Fortunately the plain straight cuffs and collar are appropriate to the embroidery...

26 September

Onwards and upwards. I eventually decided to do the neckline embroidery before cutting the opening, just because it meant I could keep carrying the shirt body around to work on. I still haven't finished the double-line edging, but it'll get there eventually.

I'm really glad I decided to do some extra measuring around the neckline before I started pencilling on the design. Not because I'd originally mismeasured, this time, but because there turned out to be a flaw in the fabric that would have been right in the middle of the embroidery! It's nothing that will affect the integrity of the shirt, but it would have looked pretty ugly. Unfortunately, that meant picking out and redoing all of the basting. (The shirt is longer in the back, so I couldn't just flip the neck opening to the other side. The shoulder "seam" had to be moved too.)

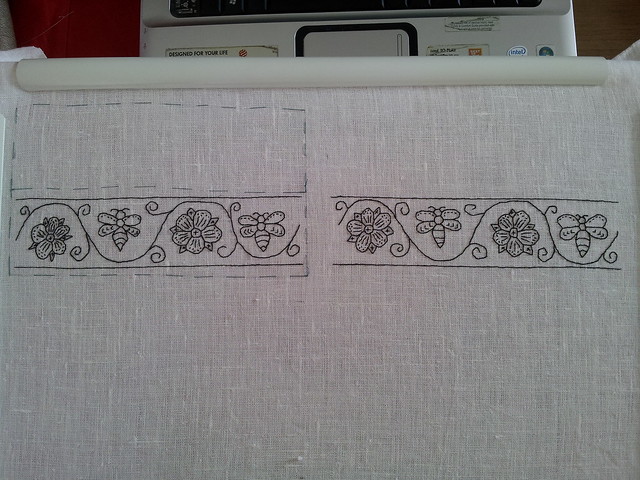
Transferring the design was made infinitely easier by my mother, who decided she was going to buy me a lightbox. Best surprise gift ever.
The templates came with the box. I'm not putting drumkits on the shirt!

I spent 10 minutes at a table instead of half an hour or more pressed against a window. I use a soft pencil for transferring designs, and only transfer a small portion of the design at a time so that the friction from working doesn't rub it off before I have a chance to embroider over it.

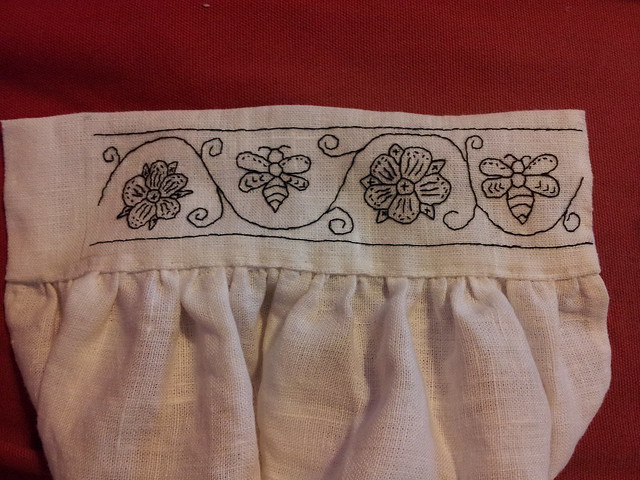
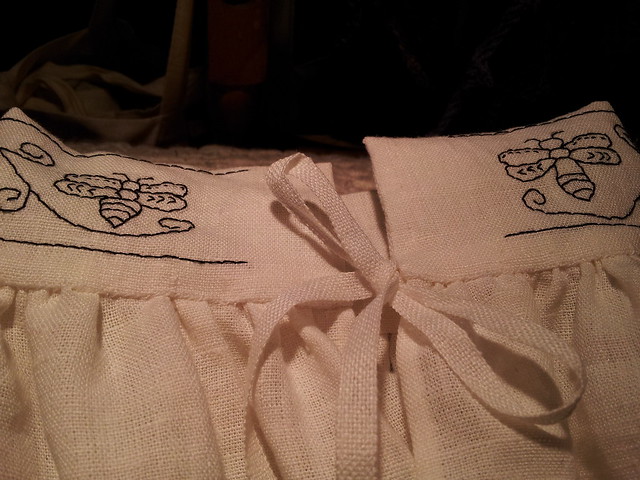
The finished neckline embroidery came out pretty well, I think:

There is, perhaps, too much white space surrounding the pelican, but I think it works. The same trellis-and-flowers appears on the cuffs and collar, and then the sleeves will have just the smaller flowers running down the length.
 

20 October

Now that the design decisions are all out of the way, there's less out-loud thinking to do here on the blog. I'm mostly just sewing. I'm a little behind where I wanted to be, but I'm making good progress. The neck and collar are completely finished, right down to sewing on the ties. This has the advantage of making it possible to put the body on a hanger and keep it safe and out of the way.

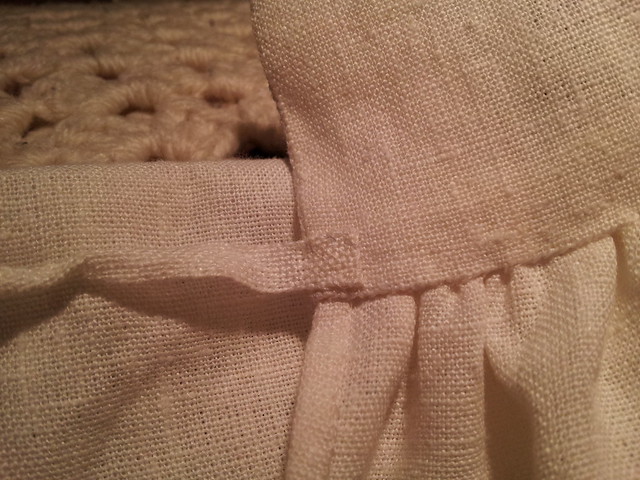
Gathering the neckline into the collar was significantly easier this time around, not to mention faster. Making the collar in two pieces is definitely the way to go. Although it means more time spent pressing, the extra layers of fabric and the seam along the top of the collar help stiffen it, which makes it hold its shape better.

In the further interests of better shape, I've added two pairs of ties to this collar. I had just one on originally, but when I tried wearing it the corners of the collar bent down and rendered the embroidery invisible. Having a pair of ties at the top of the collar should hopefully remedy that issue.

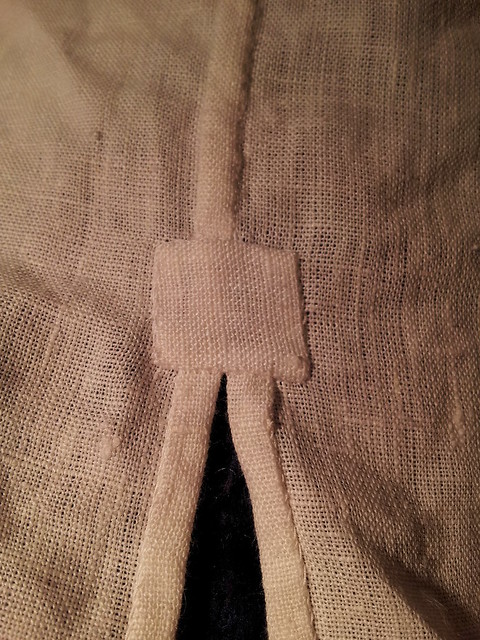
A detail I've added to the collar is a length of twisted cord. It's two strands of embroidery floss that I've couched down around the entire edge of the collar and the neck opening, using a single strand of floss. Most of the very late 16th-century shirts have narrow lace edgings around the collar and neck, but by that point the wide lace trims or frills had been replaced by separate ruffs. I don't have any appropriate narrow lace, nor the time to make any, but there's a shirt in the V&A that has both collar and cuffs trimmed with couched cord. Although that shirt is from the 1540s rather than the 1590s, I think it's a plausible treatment that could have been substituted for the narrow lace. I felt very strongly that the neckline needed something edging it, not for decoration but for reinforcement. The embroidery is too close to the hem to allow application of a reinforcing patch (deliberately close, I hasten to add!), but I don't want it to rip out with wear. The loop of cord will serve to strengthen it. Plus it really brings the whole thing together, in my not-so-humble opinion.


12 November

Racing to the finish now. Real life has delayed things a number of times, which is why I built an entire month of wiggle-room into my schedule! I've spent most of the last few weeks working the blanket-stitch edging around the completed pieces in between visits from my mother, archery practice, and helping out with my new niece. So, current status:
  • The body of the shirt is completely done, including putting the blanket-stitch edging all the way around.
  • The first sleeve and first gusset ditto.
  • The first sleeve and gusset have also been pressed and laced together, ready to go onto the shirt body once it's been pressed.
  • The second gusset is nearly finished. There's about an inch of backstitch left to do.
  • The second sleeve is in progress. I plan to have the last of the embroidery done by Friday evening.
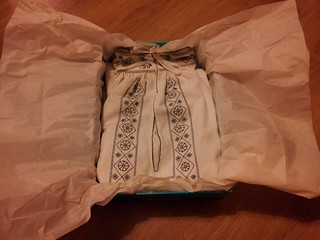
I plan to spend the weekend attaching the second cuff, working the last of the blanket-stitch, and then lacing everything together. Once that's done, it'll just be a case of writing up the documentation and buying a nice box to put everything in. And trying not to go crazy from keeping it a secret...

16 November

It's done. Holy crap it's finally done.


17 November

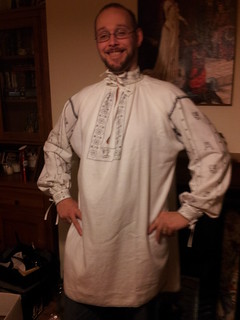
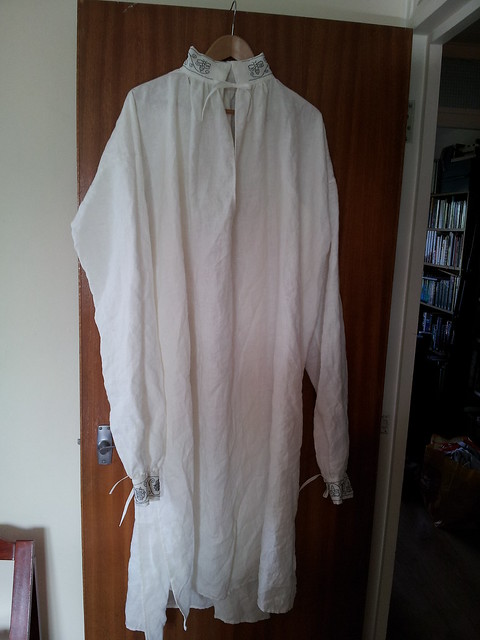
Now that my brain is functioning after the shock of being done, some numbers and a photo!


  • 19 pelicans
  • 8 stags
  • 26 large flowers
  • 124 small flowers
  • 9 hanks of embroidery floss
  • 35,000 stitches (approximately)
  • 475 hours of work (approximately)
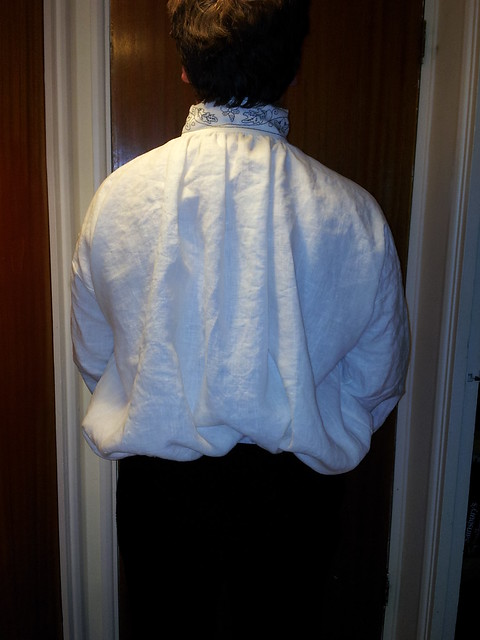
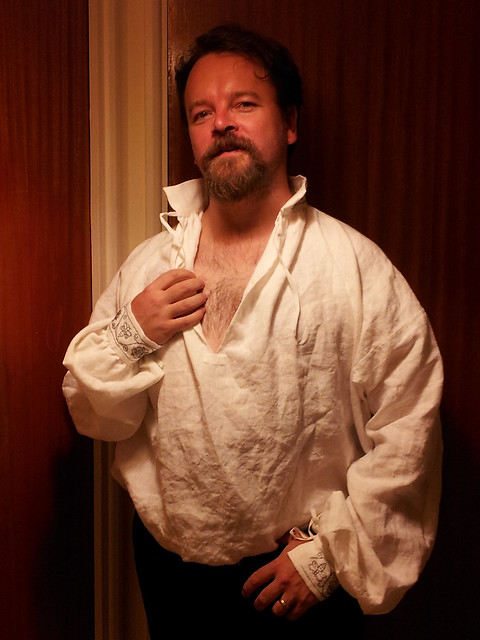
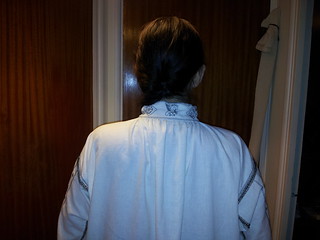
26 November

I've given the shirt to Master P. It fits, and judging by his reaction I'd say he likes it!


Thursday 18 September 2014

Becoming Lord Constantine

Ever since my realization back in June that what I really wanted to do was mid-16th-century English gentleman, I've been thinking away on how to kit myself out appropriately. This process has turned out to be rather more involved than anticipated.

One of the features of the way the SCA does things is the persona. Basically, this means creating a character who might have existed before 1600-ish, complete with name, clothing, kit, and activities. For some people it'll just be a name, and then they'll wear all sorts of clothing from different regions and periods of history. For others, there will be an elaborate backstory with family members, years of personal history, all kinds of things. Kind of like creating a Dungeons and Dragons character - the process is as elaborate as you want it to be.

Historically I've always been a "run around in whatever I fancy" sort of person, since up until now I've not felt drawn to a particular region or period. But now that I've discovered archery and the assorted stuff that goes with, I'm starting to get into the idea that actually, I'd really like to explore this one thing in depth instead of dabbling.

Coming up with a new name was first on the agenda. I wanted to use the given name "Constantine", as the name I normally use is "Constanza". I figured having two names that sounded as similar as possible would reduce confusion. Fortunately, there was a chap named Constantine living in London in 1582. I know this because Boss Herald helpfully wrote an article about the names in three sixteenth century London subsidy rolls. I had no real preference about a byname, so I made the arbitrary decision to go with something archery-related. Happily, "Fletcher" appears in the same article, this time in 1541 as well as 1582. I've submitted the name Constantine Fletcher along with an heraldic badge to be associated with it (Or, semy of strawberries proper). With any luck those will both be registered in the coming months and be all mine!

The next issue, still on-going, is figuring out what to wear. I'd already decided to make two complete outfits, one plain-ish for shooting in and one fancy for going to Court. And I wanted some extra shirts as well, because we have a 10-day event every summer and I don't fancy wearing the same two shirts for the whole thing.

The obvious place to look was portraits of men from the 1540s. With the assistance of Tyger Friend, I've started compiling as many portraits as I can find onto a Pinterest board. I'm using this to get a sense of colour, shape, and composition of outfit. This, combined with access to Before the Mast and Weapons of Warre has given me a pretty good idea of what garments I ought to make. What these resources haven't told me is how many of each garment I ought to have. That's where the wills come in.

See, during the course of my names research, I've spent a fair amount of time looking through extant wills. I'd heretofore been looking for names, of course, but it's impossible not to notice the clothing and personal effects mentioned in these documents. It occurred to me that compiling a spreadsheet of garments and jewelry mentioned in wills would be an excellent way to estimate the approximate size of a man's (or woman's) wardrobe. I've limited my search to the 1540s, since that's the period of history I'm looking at. I have access to a lot of print resources, since I work for a university library, but I'm also looking through a lot of material that's available online. Once I've put together enough data, I'll start working up a list of all the stuff I need to make.

Tuesday 16 September 2014

Plotting - the 2015 Selfish-Along

Work continues on sooper sekrit projects, so I will instead write of some of my plans for next year. (That's the trouble with projects that take months - you only get to squeeze a couple in over the course of a year.)

A theme that I've noticed recurring in conversations with my mother, Lady C (hereafter Tyger Friend), and Weaving Friend is that we all lament not having enough time to make some of the really cool stuff for ourselves. We're all prone to diving in on community projects and gift knitting, you see. And while that's great and fun, sometimes it's good to say "no" and prioritize making stuff for oneself.

I am therefore declaring 2015 a year of selfish crafting. Mostly that will mean making stuff for oneself, but it might also be making stuff as a special gift, or to try out something new that wouldn't work in a selfish project.

For me, I'm hoping to make a new set of 1540s clothing from the skin out, a quilt, some new socks, and at least one embroidery project. I realize that I'm crazy, but then there's nothing to say I can't continue the selfish-along into 2016...

Monday 1 September 2014

Research trip write-up the first - pins and a cap

Somehow it is already September and the season of secret gift projects has started. Hazards of being a craftsperson - gifts take months of forward planning. Ah well. I have been saving some research photos for just this purpose!

Back in July I was fortunate to be able to go to the Victoria and Albert Museum's research centre to work with some collection items that aren't on display. Mostly I was there to look at a shirt and a handkerchief, and those will appear in future posts. A few days before I went, though, I came across a series of pins in the online catalogue that were mysteriously labelled "ruff pins". There were no photos and only the vaguest of descriptions, so I requested them as well.

They came mounted on board as a set.


I'd wondered whether they were decorative stickpins or functional attaching pins. As you can see, they turned out to be the latter.


It's not clear whether the heads of the pins are separate rings of metal that have been slipped over the shaft, or if each pin is a single piece of wire that has been knotted at one end to form the head.


The pins are made of copper or an alloy, judging from the colour of the corrosion. Each is about an inch long, tapering to a point.

The curator also brought up an 18th-century cutwork cap by mistake. It was very pretty, though, so I took a photograph:


Thursday 21 August 2014

That thing where you're too busy crafting to post about your crafting...

The shirt is done. I got a fair number of photos during the process, so I'll run through the whole lot.

The first part of the process was designing the embroidery. I decided to base my design on the original embroidery of the shirt, albeit not as densely stitched because my fabric was coarser. I ended up with bees and roses for the cuffs:


and bees and acorns for the collar:


The bees are from his heraldic device, and the acorns are the emblem of a service award he holds. The vines and leaves are also based on the original embroidery.

I drew the pattern up actual size and then transferred it to my fabric by the very professional method of holding it up to the window and drawing it. It worked reasonably well, but I really want to get a lightbox for future projects.

I tacked the full cuff outline onto the fabric before I started embroidering the first cuff, just to ensure I didn't forget my seam allowances. (I did all of the embroidery on a single piece of fabric in a q-snap frame, and then cut it out afterwards.


Things were going great, right up until I ran out of black embroidery floss:


Seriously, who runs out of black embroidery floss? Me, that's who. Still, I went to the shop the next day, and finished all the embroidery that evening.


I don't have any photos of the next phase, but I hemmed the bottom edges of the body fabric so they wouldn't fray horribly. The sleeves went onto the shoulders next; I just used running stitch. After that I put the underarm gussets in and sewed up the arm and side seams. That process was slightly more complicated than I'd anticipated, because Patterns of Fashion doesn't seem to mention anywhere how far open the sleeves were below the cuff, or even if they were at all. Going by the cuff measurements I concluded that they had to be, otherwise you'd never get your hand through. And after some digging on the internet, I found the Flickr album of a person who had been to the Museum of Fashion and taken lots of lovely photos of the shirt, including one where you could see the slit below the cuff. No measurements, but knowing the length of the sleeve allowed me to guesstimate. This is what I ended up with:


I hemmed the open edges of the slits before putting the cuffs on. Incidentally, gathering a sleeve into a cuff is a pain and requires approximately one million pins. I'm going to need a lot more practice, but I think this went well for a first attempt.


In the above photo you can see a classic example of why it's important to double-check your measurements before you do your embroidery layout. The blackwork ought to go all the way out to the edge, but I screwed it up. Ah well. It is at least symmetrically wrong, and the collar isn't nearly so bad.

At this point, I decided to get as many of the inside seams finished as I could before starting to work on the collar. The original shirt had run and fell seams, so that's what I did too. Here's the finished underarm gusset, made possible by a Pinterest tutorial on felling underarm gussets that Lady C sent me.


I've never done felled seams before, but I'm very happy with how they turned out. Next up was cutting the collar opening. Again, no photos, but I had tacked across the shoulder "seam" so that everything would be in the right place. Cut across the shoulders and then down the front to form a slit. I hemmed the sides of those next, before gathering the opening into the collar. This was unexpectedly tricky, because you're left with no fabric at the bottom of the curve to turn into the hem. Again, I am really pleased with how this turned out.


The rectangle at the bottom of the slit is a reinforcing patch. The original shirt had them at the tops of the hip slits. I've also put them in here at the neck and on both wrists. The original shirt tore and was mended at the neck, and Himself has historically ripped out the wrists of his shirts, so I decided to put in a little extra work for caution's sake. The patches also have the bonus of covering the slightly unattractive point where hem turns into seam.


Once all the seams were done and reinforced, I had to suck it up and do the gathers for the collar. Instead of running a single thread across the full length, I started in the centre back and ran threads out to both sides. This made it a lot easier to get the gathers evenly distributed, and also meant that I was able to centre the collar properly. I think the next time I'll do three lines of gathering stitches instead of two, as some of the gathers got a little lumpy.


I managed to find a lady (at WorldCon of all places) selling 8mm linen tape. The original tapes were 6mm, but seriously, who's going to quibble over 2mm? I bought 5 yards of the stuff, so should be well stocked for the next few shirts. As in the original, I sewed them to the inside of the collar and cuffs:


though I think next time I'll enclose the ends inside the cuff. It looks better and I think is more secure.

The finished shirt is very long.


It's designed to be that way, though. When worn properly it gets tucked into the gentleman's trousers:


It should also have a doublet over the top of it. Without, though, it gives one a marvelous chance to pretend to be on the cover of a bodice-ripper:


Monday 14 July 2014

A shirt for a spouse

My spouse, in fact. Ordinarily I have a policy of not making clothing for him (because he's perfectly capable of sewing his own), but since I'm planning fancy gentleman's clothing for me I figured I might as well practice on him.

The exemplar I'm using is a linen shirt dated between 1590 and 1620 that's apparently in the Bath Fashion Museum. (I say apparently because I can't find it on their website, though it appears on a number of Pinterest boards attributed to that museum.) It is also one of the patterned examples in Janet Arnold's Patterns of Fashion 4. 

The body of the shirt is a single continuous length of cloth with no seams at the shoulders. The 38-inch-wide fabric is the full width of the cloth, with the selvedges left attached. The sleeves are rectangles, gathered into the cuffs and with a square gusset in the underarm. The neck opening is a T-shaped slit with a rolled hem along the front and with small triangular gussets inserted at the tops of the shoulders before being gathered into the collar. The back of the shirt is several inches longer than the front.

The sleeves and gussets are attached using run and fell seams. Below the underarm gusset the selvedge edges are butted together until just below the hip, at which point it falls open to the bottom hem. The bottom hem is a very narrow rolled hem. There are reinforcing strips sewn in at the tops of the side openings.

The original shirt is heavily embroidered in black silk. There are alternating columns of scrolling flowers and leaves and isolated motifs of leaves and acorns on the front and back chest and both sleeves, as well as bands of similar scrolling flowers on the cuffs and collar. The columns running alongside the front neck opening merge into a single column below the opening.

Narrow linen tapes are sewn to the wrists just above where the cuff joins the sleeve, though it is not clear whether these are the original tapes.

My fabric is wider than the original, so I'm not going to be able to use the selvedges in the same way. I'll work run and fell seams all the way down the side openings and then continue the hems up to meet them. I'm also not planning to do nearly as much embroidery - just the collar and cuffs and possibly around the neck opening, in black embroidery cotton.

First up - cutting out the body and sleeves, and setting up the fabric that's going to become cuffs and collar on my embroidery frame. 

Friday 20 June 2014

Recently

Despite all of the planning and thinking and cooking that's been going on recently, I have actually been making things. First up, a pair of socks for a certain Viscountess.


When asked how she had liked the socks I made her earlier, she hinted that she really wanted another pair. "Hinted" might be the wrong word. I think her exact words were, "I'd like another pair just like these, only purple." So, purple socks she got.

Then with the leftovers I made a pair of booties for an imminent SCA baby.


You'd never guess they were from the same yarn. But they are, and there was much cooing when I presented them.

Finally, some spinning. Not a lot, only a wee sample.


This is from a mystery fleece that I acquired last autumn. I'm aiming for a bulky 3-ply to make a cabled cardigan/coat thingie at some point. Still need to bulk this up a little bit. It is very difficult to consistently spin fat yarn.

Thursday 12 June 2014

The next big thing - The 1545 Project

There's always a big project, isn't there? This one, at least, involves needlework. Lots of it.

Last summer when I went to that event in Wales for 10 days, in addition to doing a ton of spinning and setting the foundation of my apprenticeship, I also got to try archery for the first time. Archery has turned into a love and an obsession over the last 10 months, and thanks to a ton of practice I'm becoming reasonably competent. I even went as far as buying a longbow back in March.

What this means, though, is that my spiffy new Viking clothing is All Wrong. One simply doesn't shoot an English longbow while dressed as a Viking. For a start, the tortoise brooches get in the way of the string. And one can never have too many spiffy outfits.

I'd been kicking around ideas for some English garb to go with my bow for a while, and over the last fortnight an Idea has coalesced. (Incidentally, making garb to match one's bow is a pretty sure indicator of an archery obsession.)

First I went to an event in Ireland and somehow ended up trying on the clothing of one of the gentlemen in attendance. (It was a strange and entertaining evening. Let's just leave it at that.) They fit beautifully, although the doublet was a little long in the waist, and were terribly comfortable. When asked, he remarked that they were mid-16th-century English. I'd been meaning to make some male clothing for inclement weather, so we agreed to swap skills so he'd learn knitting and spinning while I got patterns.

Then I went looking for evidence of what the string of my bow would have been made of so that I could make some. (Further evidence of obsession.) I found myself reading Toxophilus, which is the first English-language archery manual, published in 1545. Coincidentally, 1545 is the same year the Mary Rose went down. In addition to just being extremely interesting, archaeologically-speaking, the Mary Rose finds include the largest single body of pre-1600 archery equipment ever found.

I have the plans for clothing and I have the primary sources for how archery was done at the same point in history. So basically, I've decided that I'm going to kit myself out as a gentleman archer of 1545. Clothing from the skin out, all the archery accoutrements, new arrows, and a new bow. Because it turns out that my bow isn't actually appropriate for the clothing I'm now planning to make!

Thursday 5 June 2014

Luncheon for... forty-one!*

The most important thing I have learned about being an apprentice: never express interest in a Cool Project unless you want Boss Laurel** to respond, "That does indeed sound cool. I look forward to reading your project report".

Completely unrelatedly, I spent Friday and Saturday morning cooking a documented 10th-century Arabic lunch at an SCA event.

A while back, the lady coordinating the food for the weekend put out a call for new and inexperienced event cooks to undertake a single meal at this event. I've spent a fair amount of time as a kitchen minion and am a reasonably competent cook, but had never before planned and/or implemented an entire meal on this scale. However, we'd*** just received a copy of the Annals of the Caliphs' Kitchens for Christmas, and Boss Laurel wanted me to start working my way up to cooking a feast. So in a fit of madness, I volunteered for Saturday lunch with the intention of doing the whole meal from that cookbook.

The book itself is marvelous. It's a complete annotated translation of a 10th-century manuscript, along with extensive notes on Islamic cuisine, dining, and medical practices, and a glossary of terms that occupies nearly half the book. I've been working my way through it since January and might eventually know my way around it properly in a year or two. What makes it even more unusual is that it's full of measurements - and the author has included the original measurements as well as an approximate modern equivalent, weights to weights, volumes to volumes. There's even a discussion on the properties of the wheat used in the region at that point in history, allowing one to use appropriate flour for bread-making.

So. I knew going in to the planning that I wanted something that could be prepped as much in advance as possible (so I didn't run the risk of lunch being late). I wanted something that wouldn't be ruined if lunchtime ended up either earlier or later than planned (so that everything would still taste good). I wanted something that sounded tasty to me personally (because there was no way I was going to cook a meal that I wouldn't eat). I wanted something that wasn't too out there, flavour-wise (because there was no way I was going to cook a meal that no-one else would eat). And finally, I wanted something that involved vegetables and/or fruit (because bread and cheese and cold meat is not so good for the digestion).

My initial thought was to do some sort of stew or casserole, but as I started looking through the recipes I found several chapters of cold dishes. The advantage of cold dishes is that they can be completely plated up in advance and served directly from the fridge. And as far as the recipes went, chilled was better because ice was an expensive luxury good - if one served a guest chilled food, it was an indication of esteem. Plus it was the very end of May, so there was a reasonable chance that the weather would be warmish. Hot stew would have been overly-filling.

As I read through the recipes for cold dishes, I noticed that they were all variations on a theme of "cook and chop or shred a thing, make a sauce, dress the thing, garnish with cucumbers and fruit". One shredded meat and one chopped vegetable seemed like the right amount for a lunch, so I settled on chicken and aubergine, along with four sauces in total. Rather than dressing them as separate dishes, though, I decided to serve both plain with the sauces alongside. That way people could have as much or as little of any of the sauces as they chose, and any children or fussy eaters could have plain food. Not quite how they'd have been served, but the food was unusual enough that I didn't want to scare anyone.

The chapters on cold dishes all indicate that they are to be served before the meal, i.e. as appetizers. I decided to treat the whole lunch as a precursor to the feast that would follow in the evening. I wanted to have lots of little nibbly things and lots of flavours. Enough that people would go away feeling satiated but not stuffed.

The final menu was this:

  • Roasted chickens (shredded) and cooked aubergines, served with four sauces
  • Flatbreads  
  • Olives 
  • Apricots and figs
  • Peeled sliced cucumbers
Because I was flying in from another country my lady Boss Cook kindly agreed to do all of my shopping for me. The shopping list I priced up was under budget, so I assume the actual groceries were likewise. She also ended up cooking and shredding the chicken for me for reasons of space in transport.

Olives in brine are listed as a good thing to eat before the meal in chapter 24 (humoral properties of condiments).

Apricots and figs are both included in chapter 26 (seasonal fruits and fruits served before the meal), though they really should have been fresh rather than dried. Fresh fruit is a lot more expensive, unfortunately.

The first two sauces are from chapter 31 (cold poultry dishes served before the hot food). The first was made of:
  • Ground almonds
  • White sugar
  • Cucumber pulp
  • Wine vinegar (white, in this case)
  • Salt
  • Olive oil
  • Mint
  • Basil
Strictly speaking it should also have had thyme (but the shop failed to supply it) and almond oil (which is expensive). The fresh herbs were to be minced and sprinkled over everything, but since I was serving the sauce separately I decided to stir them in.

The second:
  • Vinegar
  • Salt
  • Ground caraway
  • Cassia (I substituted cinnamon)
  • Galangal
  • Olive oil
  • Mint
  • Parsley
This one should also have had rue, but it's impossible to find and potentially dangerous. I'd eat it myself under controlled circumstances, but there was no way I was going to feed it to a large group miles from the nearest hospital.

 The next sauce was from chapter 39 (making yogurt, drained yogurt, and cheese). The sauce is called jajaq, and is really honestly not tzatziki. Honestly.
  • Yogurt
  • Salt
  • Mint
  • Cucumber pulp
This one was an interesting sauce to make. The recipe proper called for garlic (which I had intended to add but didn't), chopped onions, parsley, tarragon, rue, lettuce stems, artichokes, and green almonds. However, the recipe is followed immediately by a translation of a poem that describes five separate bowls of yogurt, each with a single green herb flavouring it. That, plus knowledge of modern variations on this sauce, led me to infer that the recipe itself was listing all the options exhaustively, rather than instructing the cook to use all of them together.

The final sauce was from chapter 45 (making cold dishes of vegetables and the best of roots).
  • Vinegar
  • White sugar
  • Ground almonds
  • Caraway seeds
  • Cassia (again, I used cinnamon)
This should have had saffron in it, but it's expensive and one of the attendees was allergic to it. Having tried it both with and without at home, though, it didn't really change anything other than the colour of the sauce.

The final component of the meal was the flatbread. I took the recipe from chapter 13 (humoral properties of grains and bread made from wheat and rice). I used spelt flour (both to deal with a wheat intolerance and because it's closer to 10th-century wheat, chemically-speaking), water, salt, and yeast to make a stiff, heavy dough, let it rise for half an hour, rolled it into small discs with a very small amount of olive oil on the outside, and then dry-fried them in a cast-iron pan. Only set off the smoke detector once!

Rather than using active dry yeast I should really have been using a yeast dough starter, which would have changed the flavour. However, since I was travelling to the event that wasn't really an option.

Cooking the bread was the most time-consuming part. 10 minutes to mix 2kg of flour into dough, then the rise, then cooking the breads two at a time for 2 minutes each. I made around 50 of them, I think. The sauces all got made up the night before. The chicken was already done when I got there, but since I'd originally planned to use pre-cooked hot chickens from the shop, the only extra time would have been from picking the carcasses. And then cooking the aubergines took 15 minutes, plus the 45 minutes it took for the water to come to a boil. Fortunately I woke up earlier than I'd planned.

As I was cooking the bread with the help of Boss Cook's bearded assistant, my trusty kitchen minions plated up all the dried fruit and the olives. At that point, the only things left to do were last-minute, so we all had a good break of about an hour.

We ended up with two attendees who didn't eat chicken, so for them I made baked stuffed aubergines. The stuffing was spiced rice left over from supper the night before with ground almonds mixed in, and I baked the aubergines with olive oil, salt, cinnamon, and caraway before stuffing them.

I think it went well. There were almost no leftovers, just enough that it didn't appear anyone went away from the table hungry. Everything was on the table at the right time at the right temperature, and I managed to make it so that everyone was able to eat all of the food or all but one item.

And yes, I'm already plotting my next meal.


*My mother has immediately gone to a scene from the film Easter Parade. That scene doesn't appear to be on YouTube, but this one which she will also have gone to is.

**The same is also true of Boss Herald.

***Technically it was the Spouse's Christmas present, but he's mostly playing with Roman food at the moment and I was feeling inspired.

Monday 14 April 2014

A study in orange

I discovered when I was about seventeen that I'm able to wear orange well. It's a strange colour, orange - people either love it or hate it. I happen to love it, so being able to wear it makes me very happy.

Consequently, my stash features a lot of this delightful hue. I'm working on a delicious orange shawl at the moment (in cobweb-weight Posh), but I've mostly been playing with orange handspun recently.

I decided to do some experimenting with a braid of bamboo/merino that I bought at the first Knit Nation. I had never tried spinning bamboo before, nor did I particularly have any desire to. However, it was literally the only orange fiber I was able to find in the entire marketplace. It's been sitting in my stash ever since while I decided what to do with it. I was taken with the urge to master singles yarn, so out came the orange. It was horrifically compacted. Not felted, which was good, but it took me most of an hour to fluff it out enough to spin. And once I'd unbraided it, I discovered that the bamboo wasn't blended in very well. In fact, it was almost possible to just pluck it out entirely. I didn't, of course, but I ended up with rather barber-poled yarn.

Merino/bamboo singles

I'm happy with it overall. It's pretty, and I managed to have it not be wiry. I like very tightly spun and plied yarns for the most part, so it was difficult to keep the twist to a minimum. 250-odd yards, 105g. Once it came off the wheel I fulled it slightly with alternating hot and cold baths, and then beat it on the side of the bath.

After that, I dug some older orange handspun out of the stash. This was from some batts I won on Ravelry. It's very soft and fluffy, but I had no idea what to do with it until Heraldic Friend pointed out that I'd never made anything for her daughter, who happens to be my niece in the SCA. This was an appalling state of affairs, so I resolved to make something for my lady Makeblise immediately.

The result of this was a pixie hat. It'll be a bit big for her right now (it's nearly big enough for me), but I was determined that she'd not outgrow it in less time than it took to make.

Untitled