Having made one fairly straightforward shirt, I decided to dive immediately into the next one. I wanted to do something more complicated, and as it happened I had the perfect project in mind. This is what I did.
24 August
I've been planning to make something as a gift for Baron P., the guy who taught me to shoot last year and started me off on this whole saga of archery, late-period English clothing, and a million crazy research projects. (Come to think of it, I'm not entirely sure why I'm making him a present. But it's too late now.) I figure, all the hours he's put in answering my questions, he deserved something shiny. Coincidentally, he's recently been spiffing up his own garb and at Raglan was elevated to the Order of the Pelican. So instead of the embroidered collar and cuffs I'd originally thought I'd do, I decided that I'd go all out and make a complete shirt with fancy embroidery, frilled collar, the lot.
The first step was figuring out how I was going to construct the whole thing. I've been poring over Patterns of Fashion 4, looking at all the different shirts and how they were put together. Based on those, it looks like the most common method was a single long strip for the front and back, usually made from the full width of the cloth. Sleeves either straight with an underarm gusset or trapezoids without. The cool thing is that the pieces are usually hemmed all the way around and then joined with insertion embroidery rather than being seamed. So that's what I'm doing - a single piece of cloth for the body, straight sleeves with a gusset, and hems and insertions.
I spend the morning cutting out the pieces that get hemmed. The linen I've got is 54 inches wide, which is far too wide for a shirt. Consequently, I'll have a selvedge on one side and a hem on the other. There are examples of this in the book (items 2 and 5, in Munich and Prato respectively), so it's an acceptable option. I've cut the shirt body 30 inches wide, which leaves me with exactly the right amount of fabric to the side to be the full length of the sleeve, leaving the selvedge on the cuff end of the sleeve. I've cut both of them out as well. I then cut a strip 5 inches wide below the sleeves. Two 5-inch squares will become the underam gussets; the rest of the strip will be for me to practice the insertion stitches and test the embroidery. I may use a bit to make gussets for the neckline also.
My next task is to hem all the pieces I cut out. I've hemmed one gusset and one sleeve today. Once the hemming is done, I'll chart up the embroidery and start working on the sleeves. The gussets are small enough that I'll be able to take them in with me to work and do the stitching around the edge that becomes the foundation for the insertion.
26 August
I spent most of yesterday brainstorming the design for the sleeve embroidery. I knew I wanted to do columns and spot motifs like the Bath Fashion Museum shirt I used as a model for shirt the first, but beyond that I had no specific ideas. Those sleeves had three columns of densely stitched vines and flowers running down the length of the shirt. In between were isolated motifs of oak leaves and acorns, and bees. I didn't really want to do flowers again, and the acorns-and-bees thing would just be too similar to what I'd done for my husband. Fortunately, there was a very obvious choice for something to use as a spot motif - a pelican in her piety. I recalled that Patterns of Fashion had reproduced a number of motifs from Schole-House for the Needle (a pattern book published in 1632), and as it turned out, one of them was of a pelican. Serendipitously, on the same page was reproduced a springing stag, which just so happens to be on the Baron's coat of arms.
After an hour of sketching and rubbing out designs:
and a little trying things out with needle and thread:
I finally got to the point where I had a concept that I liked.
29 August
My self-imposed deadline for this project is an event taking place the last weekend of November. In other words, I've got just about three months to finish. Because I'm a crazy person, I decided to write up a list of all the bits that need to be done between now and then to get the shirt finished.
- Finish hemming the second sleeve
- Hem the body
- Embroider both sleeves
- Embroider the neck opening
- Embroider the collar
- Embroider both cuffs
- Embroider and hem the frills for the collar and cuffs
- Work the foundation for the insertions on the seams
- Assemble the cuffs with frills and ties
- Assemble the collar with frill and ties
- Gather sleeves and attach cuffs
- Cut and hem neck opening
- Reinforce bottom of neck slit
- Gather neck opening and attach collar
- Lace the seams together.
2 September
I've finished the hemming! (Ok, the frills still need to be done, but I can't do them until they're embroidered and cut out.) My brain has very kindly been providing me with inspiration and the ability to make decisions over the last couple of days, so things are progressing. I ended up deciding firmly in favour of embroidery all the way around the edges of the body and have started working on them while I wait for the Muse to decide whether she's happy with the modifications I've made to the initial embroidery sketches.
My very scientific method of deciding how many motifs I wanted on the sleeves - cutting out bits of paper roughly the same size as the motifs and laying them on the fabric until it suited me:
8 September
Mental progress, if not a great deal of physical progress. I have finished designing the embroidery. This is the design for the cuff:
The collar will be the same, only with more repeats of the lattice and flowers between the pelicans. The embroidery that borders the neck opening will be the same, only with the lattices running vertically and a single pelican at the base of the opening.
The sleeves will have a similar lattice, but it'll be narrower. Instead of 8-petalled flowers inside the diamonds formed by the lattice, the smaller 4-petalled flowers will appear. There will be three columns of lattices on each sleeve. In between the lattices there will be two columns of five spot motifs, each comprising alternating pelicans and stags (three and two of each, respectively). The frills will have individual 4-petalled flowers without the lattices.
All of the lattices are bordered by a straight double line. That double line is what I am using as the edge embroidery.
Now that the design decisions are mostly out of the way, it's time to crack on with the sewing. Today's mission is figuring out my cutting layout for the collar, cuffs, and frills. I enlisted the help of Baron P's lady wife to get his collar measurement, and I'm making it the same width as the previous shirt. Looking at different frills on extant shirts, they seem to range from 1.5 to 3 times as long as the band they are set in. My frill is going to be 35.5 inches long because that's the length of the piece of fabric I have left. I've decided to use the selvedge edge for the frill to save time hemming - this fabric has gorgeous selvedges, almost indistinguishable from the fabric proper, so it won't be obtrusive.
later on the 8th
No embroidery on the frills. I tried it, and it frankly looked like crap once it was all gathered up. Ah well, at least that's a few hours saved!
10 September
Some photos of my progress to date. The long strip at the bottom is the collar frill, now hemmed on the two short ends. The big pieces are the sleeves, and the two small squares are the underarm gussets. (Incidentally, several of the extant shirts I've been looking at have embroidered gussets. Seriously. Talk about conspicuous consumption!)
I'm still beavering away at the embroidery on the body of the shirt over my lunch hours at work. It's utterly mindless, and the body is completely hemmed so I don't have to worry about it fraying from being hauled around.
The red basted lines are the shoulder "seam" and the neck slit. At least, they will be once I've cut them. I'm still trying to decide whether it would be better to cut the openings and hem the neck slit before or after I work the embroidery around the neckline.
25 September
Sigh. Things are never straightforward. That annoying niggling voice in the back of my head has been telling me that the style of embroidery I'm doing really doesn't match the style of shirt, and after doing rather a lot of thinking and research, I've concluded that the voice is right. (Also the voice didn't like the 8-petalled flowers I'd designed, so I've changed them.)
The problem is with the frills, or rather with the combination of frills plus embroidery. The style of embroidery is very firmly in the style of the 1590s, by which point frills on shirts had disappeared in favour of detached ruffs. Since there's no way in hell I'm redoing all that embroidery, I've decided to just skip the frills. Fortunately the plain straight cuffs and collar are appropriate to the embroidery...
26 September
Onwards and upwards. I eventually decided to do the neckline embroidery before cutting the opening, just because it meant I could keep carrying the shirt body around to work on. I still haven't finished the double-line edging, but it'll get there eventually.
I'm really glad I decided to do some extra measuring around the neckline before I started pencilling on the design. Not because I'd originally mismeasured, this time, but because there turned out to be a flaw in the fabric that would have been right in the middle of the embroidery! It's nothing that will affect the integrity of the shirt, but it would have looked pretty ugly. Unfortunately, that meant picking out and redoing all of the basting. (The shirt is longer in the back, so I couldn't just flip the neck opening to the other side. The shoulder "seam" had to be moved too.)
Transferring the design was made infinitely easier by my mother, who decided she was going to buy me a lightbox. Best surprise gift ever.
 |
| The templates came with the box. I'm not putting drumkits on the shirt! |
I spent 10 minutes at a table instead of half an hour or more pressed against a window. I use a soft pencil for transferring designs, and only transfer a small portion of the design at a time so that the friction from working doesn't rub it off before I have a chance to embroider over it.
The finished neckline embroidery came out pretty well, I think:
There is, perhaps, too much white space surrounding the pelican, but I think it works. The same trellis-and-flowers appears on the cuffs and collar, and then the sleeves will have just the smaller flowers running down the length.
20 October
Now that the design decisions are all out of the way, there's less out-loud thinking to do here on the blog. I'm mostly just sewing. I'm a little behind where I wanted to be, but I'm making good progress. The neck and collar are completely finished, right down to sewing on the ties. This has the advantage of making it possible to put the body on a hanger and keep it safe and out of the way.
Gathering the neckline into the collar was significantly easier this time around, not to mention faster. Making the collar in two pieces is definitely the way to go. Although it means more time spent pressing, the extra layers of fabric and the seam along the top of the collar help stiffen it, which makes it hold its shape better.
In the further interests of better shape, I've added two pairs of ties to this collar. I had just one on originally, but when I tried wearing it the corners of the collar bent down and rendered the embroidery invisible. Having a pair of ties at the top of the collar should hopefully remedy that issue.
A detail I've added to the collar is a length of twisted cord. It's two strands of embroidery floss that I've couched down around the entire edge of the collar and the neck opening, using a single strand of floss. Most of the very late 16th-century shirts have narrow lace edgings around the collar and neck, but by that point the wide lace trims or frills had been replaced by separate ruffs. I don't have any appropriate narrow lace, nor the time to make any, but there's a shirt in the V&A that has both collar and cuffs trimmed with couched cord. Although that shirt is from the 1540s rather than the 1590s, I think it's a plausible treatment that could have been substituted for the narrow lace. I felt very strongly that the neckline needed something edging it, not for decoration but for reinforcement. The embroidery is too close to the hem to allow application of a reinforcing patch (deliberately close, I hasten to add!), but I don't want it to rip out with wear. The loop of cord will serve to strengthen it. Plus it really brings the whole thing together, in my not-so-humble opinion.
12 November
Racing to the finish now. Real life has delayed things a number of times, which is why I built an entire month of wiggle-room into my schedule! I've spent most of the last few weeks working the blanket-stitch edging around the completed pieces in between visits from my mother, archery practice, and helping out with my new niece. So, current status:
- The body of the shirt is completely done, including putting the blanket-stitch edging all the way around.
- The first sleeve and first gusset ditto.
- The first sleeve and gusset have also been pressed and laced together, ready to go onto the shirt body once it's been pressed.

- The second gusset is nearly finished. There's about an inch of backstitch left to do.
- The second sleeve is in progress. I plan to have the last of the embroidery done by Friday evening.
16 November
It's done. Holy crap it's finally done.


17 November
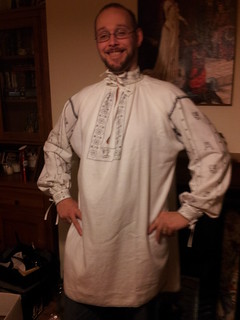
Now that my brain is functioning after the shock of being done, some numbers and a photo!

- 19 pelicans
- 8 stags
- 26 large flowers
- 124 small flowers
- 9 hanks of embroidery floss
- 35,000 stitches (approximately)
- 475 hours of work (approximately)
26 November
I've given the shirt to Master P. It fits, and judging by his reaction I'd say he likes it!


1 comment:
Fantastic, best shirt in the whole kingdom
Post a Comment